

DIY: Lightbulb Ornaments
April 7, 2014
For this project, I used a burned-out, old light bulb that I had around the house. If you are very careful with the glass, you can make a decorative ornament out of it. It took me a few tries and a few breaks to make it perfect, but it was doable.
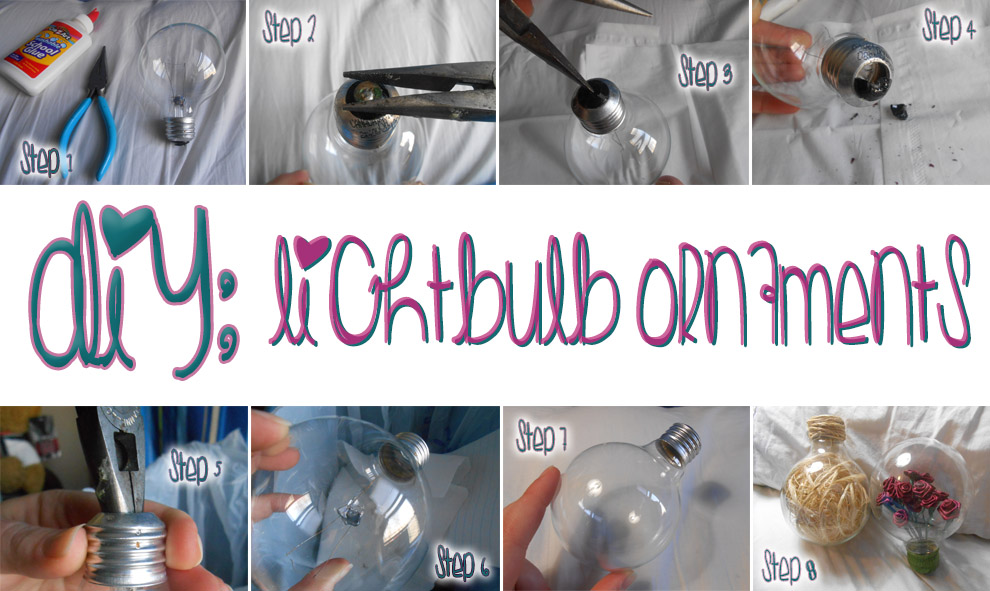
Step 1: For this project, you will need a burned-out light bulb, or a new one, whichever is easier for you to access. Some glue would be helpful, along with needle-nosed pliers and then whatever decoration you choose to put into the bulb.
Step 2: Use the pliers to curl the edges of the metal flap on the bottom of the bulb, so that you can pull it out of the fixture.
Step 3: Once the metal flap is off, gently put the tip of the pliers into the hole on the bottom of the light bulb. Start moving it around to loosen up the sides so you can get it out.
Step 4: Turn and twist the pliers to break up the black, rock-like cap. You may want to do this part over a trash can.
Step 5: Once the black part is out, all that is left to take out are the wiring and tubes on the inside. Start loosening the edges from the side of the metal part.
Step 6: Now that it’s loose, just pull the entire tubing out of the bulb.
Step 7: Inspect! Hopefully it is totally clear on the inside and ready for whatever you want to decorate with.
Step 8: Now it’s time to be creative. Choose whatever you want to put on the inside. I did flowers because it’s springtime and it’s easy to get through the small opening on the end of the light bulb. You can also put rope around the metal part on the end of the bulb for an extra pop.